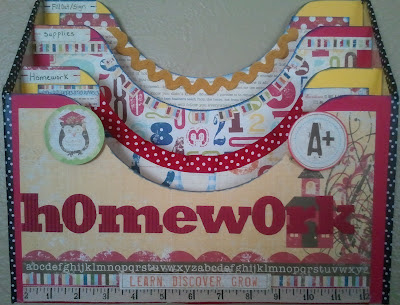
Homework Center, my Xyron and my 100th Post Giveaway!
Here is my Son's & soon to be Daughters Homework Station.
Well the Main part of it.
Made all with the help of my little XYRON 1.5 " Create a Sticker Maker
Now some of you may know I teach at Michael's.
This little sticker maker is one of my favorite products that I suggest to all my students.
Particularly my student's new to the Paper Crafting world.
Check out how I transform the mess you see below in the the Homework station you see above.
Oh and since this is my 100th post I thought I would do a little giveaway.
Just post a comment below and I will do a random drawing on April 30, 2012.
One lucky winner will receive their own little Xyron Create a Sticker.
Tell your friends.
First I traced out all my parts of paper to put on my Rack.
I inked up a little bit of each of my parts I was putting on my station.
I used g Studio little ink pads I get in the $1 bin at Michael's
And most of my paper is from Simple Stories ele.ment.ary collection & Life documented Collection
Now here is my little XYRON in action.
I absolutely love using this machine for attaching ribbon to everything.
And it is so easy to use.
Here is a little video all about it.
Now remember when using the XYRON machine use up all the space you can.
I put two ribbons in at once so as not to waist my sticky stuff. (like that technical term)
Now once you have your item all sticky and have cut it from the machine....
Rub the top like crazy to get all that adhesive on the clear bit.
And don't forget to rub the back particularly if you have something thick on there.
Now here are my Homework corrugated letters I ran through.
And they did not get squished one bit. I love it.
A little tip use a stylus or something semi pointy to get into those little spots to get the adhesive to lift off.
Makes it easier later.
Even easier leave the centers of letters on to not have to press out so much adhesive.
Here are some cute little circle stickers I made using my circle Marvy Punch,
and my Sticker Maker
Now check out the Finished product....
To the left a close up of the file holder that now has designated spots so no lost homework, permission slips or supplies. Above a look at the while file holder. I used the Xyron for all the ribbon and little bits I needed to put on. The black and white polka dot trim is Paper tape from EK's Newer Smash Collection.
Here is a little pencil holder I decorated using the Paper tape and paper. And of course my Xyron sticker maker, which helped me put on all the paper.
Here is a little dry erase board for notes etc.
Again paper tape and my xyron to put on those stickers I made above.
And here is my children's entire Homework Center.
Of course my little XYRON is part of it. But I think I really need to get them their own.


Comments
Tracy
Lesley @ Trendy Twine
In either case...I love this project!! And I love that you used the Smash tape! I have two rolls of it, and this is an awesome way to use some of it!!
amyis300 AT hotmail DOT com
scrapthissavethat.blogspot.com